

If you’re reading this, you’re likely familiar with the term Environmental Monitoring Programme, or EMP. This guide aims to consider EMP not only as a compliance requirement but also as a crucial diagnostic tool for your facility’s microbial health. Whether you are complying with the Department of Health’s R638 regulations, meeting Global Food Safety Initiative (GFSI) recognised standards like FSSC 22000 or BRCGS, or simply seeking to protect your brand from the risks of a product recall, understanding your food safety environment is vital.
In the following pages, we will go beyond theory. We will clarify what it truly means to monitor microorganisms in a food processing setting and provide a practical, 8-step plan to establish an effective programme.
Firstly, it’s important to recognise the changing landscape as the foundation of our prerequisite programmes (PRPs) evolves. ISO/TS 22002-1:2009 is has been replaced by two new standards.:
Together, these form the new basis of PRP compliance. This guide will help you understand how to adjust your systems to stay ahead of these changes.
Let’s begin.
Part 1: The Foundation – Why We Can’t Rely on Our Eyes
The Invisible Enemy
Why sample the environment? A clean facility isn’t enough because pathogens like Listeria, Salmonella, and E. coli are microscopic and invisible. They don’t show signs like smell or colour, so a spotless look doesn’t guarantee safety. Traditional senses can’t detect them; scientific methods are needed to monitor and translate the invisible microbes into manageable data.
Consider this:
Relying only on visual inspection is a trap. The only way to tell if a facility is ‘clean’ or ‘safe’ is through scientific monitoring. Without an EMP, contaminated surfaces could infect the product for weeks before the problem is detected.
Our key takeaway is this: The enemy is invisible. It is like boxing a ghost. We cannot manage what we cannot measure.
Therefore, our approach must be twofold:
Part 2: The Rulebook – Where Do the Requirements Come From?
As professionals, we are guided by customer requirements, local regulations and international standards. The primary reference point for food safety globally is the Codex Alimentarius. When we design an EMP, we align with specific guidelines that ensure our approach is scientifically sound and legally defensible.
Four key Codex documents form the backbone of Environmental Monitoring:
In summary, an EMP is not a random activity. It is:
Part 3: The GFSI Benchmark – What the Top Standards Require
For those certified to GFSI-benchmarked standards like BRCGS or FSSC 22000, the expectations are even more specific. The release of the GFSI Benchmarking Requirements Version 2024 has updated these expectations, particularly in section FSM 19.
BRCGS Global Food Safety Standard, Issue 9
BRCGS v9 provides a logical, sequenced approach to EMPs.
FSSC 22000, Version 6
FSSC 22000’s requirements are layered across its scheme documents.
Part 4: The 8-Step Roadmap – Implementing Your EMP
Now that we understand the ‘why’ and the ‘what’, let’s move to the ‘how’. This is your practical roadmap, based on the 8 General Principles of Microbiological Risk Management from CODEX CAC/GL 63-2007.
This is a cycle. It’s circular because risk management is a continuous process of improvement.
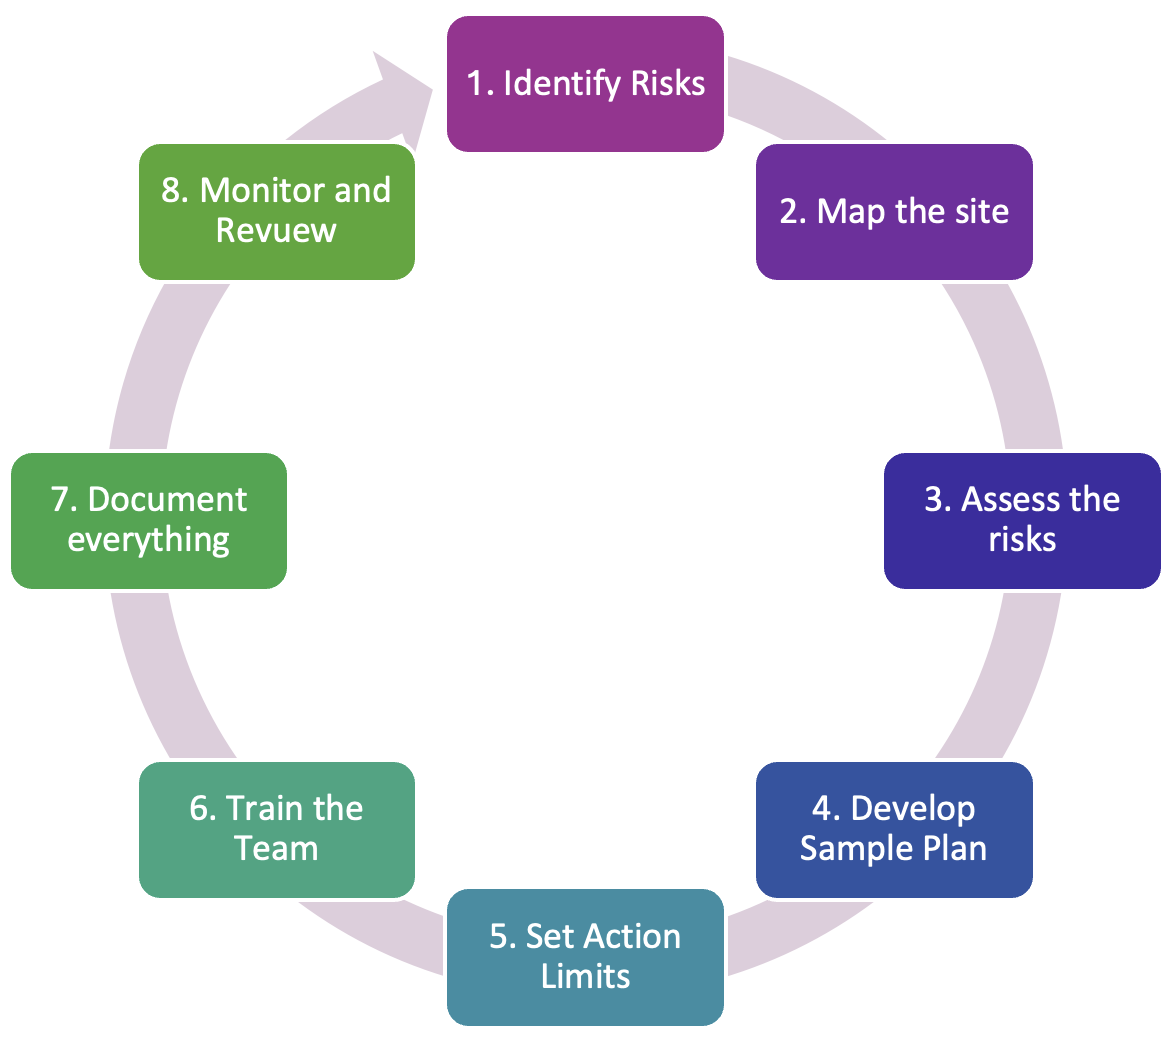
Let’s break down each step.
Step 1: Identify the Risks
Before swabbing a single surface, you must know where the dangers are hiding. Consider both external and internal sources.
Step 2: Map and Zone the Facility
Draw a literal map of your facility and divide it into zones based on how close a surface is to the food product. This creates a hierarchy for your testing efforts.
How to Create Your Map:
Step 3: Assess the Risks
You can’t swab every site every day. You need to filter your long list down to the critical few by quantifying the risk.
Use the core formula: LIKELIHOOD × SEVERITY = RISK
Score each site using these five criteria:
This assessment assigns each site a Risk Score, which determines your monitoring frequency (e.g., high-risk sites weekly, low-risk sites monthly).
Step 4: Develop the Sample Plan
Now, build the operational plan. This document answers the questions: What, Where, When, and How?
Step 5: Set Action Limits
You need to define the ‘line in the sand’—the criteria that will trigger a response. This involves setting Alert and Action Limits.
Key Principle: Action limits should be more sensitive than acceptance criteria.
Step 6: Train the Team
A plan on paper is useless if the people on the floor don’t know how to execute it. Training must be role-specific.
Step 7: Document Everything
In food safety, “If it isn’t written down, it didn’t happen.” Your documentation is your evidence.
Your documentation package must include:
Step 8: Monitor and Review
This is the engine of continuous improvement, connecting the end back to the beginning.
Conclusion: Your Journey to a Safer Facility
Implementing a robust Environmental Monitoring Programme is not a one-time project; It’s a fundamental shift in how you view your facility, moving from relying on visual inspection to using scientific data. By following these 8 steps, you transform your EMP from a simple “audit box” into a vital diagnostic tool. You enable your team to see the invisible enemy, measure what you manage, and proactively protect consumers, your brand, and business. The rules are set, standards are clear, and the roadmap is here. The next step is yours. Start today.
For assistance with the development of your Environmental Management Programme, contact info@entecom.co.za
If you’re reading this, you’re likely familiar with the term Environmental Monitoring Programme, or EMP. This guide aims to consider EMP not only as a compliance requirement but also as a crucial diagnostic tool for your facility’s microbial health. Whether you are complying with the Department of Health’s R638 regulations, meeting Global Food Safety Initiative (GFSI) recognised standards like FSSC 22000 or BRCGS, or simply seeking to protect your brand from the risks of a product recall, understanding your food safety environment is vital.
In the following pages, we will go beyond theory. We will clarify what it truly means to monitor microorganisms in a food processing setting and provide a practical, 8-step plan to establish an effective programme.
Firstly, it’s important to recognise the changing landscape as the foundation of our prerequisite programmes (PRPs) evolves. ISO/TS 22002-1:2009 is has been replaced by two new standards.:
Together, these form the new basis of PRP compliance. This guide will help you understand how to adjust your systems to stay ahead of these changes.
Let’s begin.
Part 1: The Foundation – Why We Can’t Rely on Our Eyes
The Invisible Enemy
Why sample the environment? A clean facility isn’t enough because pathogens like Listeria, Salmonella, and E. coli are microscopic and invisible. They don’t show signs like smell or colour, so a spotless look doesn’t guarantee safety. Traditional senses can’t detect them; scientific methods are needed to monitor and translate the invisible microbes into manageable data.
Consider this:
Relying only on visual inspection is a trap. The only way to tell if a facility is ‘clean’ or ‘safe’ is through scientific monitoring. Without an EMP, contaminated surfaces could infect the product for weeks before the problem is detected.
Our key takeaway is this: The enemy is invisible. It is like boxing a ghost. We cannot manage what we cannot measure.
Therefore, our approach must be twofold:
Part 2: The Rulebook – Where Do the Requirements Come From?
As professionals, we are guided by customer requirements, local regulations and international standards. The primary reference point for food safety globally is the Codex Alimentarius. When we design an EMP, we align with specific guidelines that ensure our approach is scientifically sound and legally defensible.
Four key Codex documents form the backbone of Environmental Monitoring:
In summary, an EMP is not a random activity. It is:
Part 3: The GFSI Benchmark – What the Top Standards Require
For those certified to GFSI-benchmarked standards like BRCGS or FSSC 22000, the expectations are even more specific. The release of the GFSI Benchmarking Requirements Version 2024 has updated these expectations, particularly in section FSM 19.
BRCGS Global Food Safety Standard, Issue 9
BRCGS v9 provides a logical, sequenced approach to EMPs.
FSSC 22000, Version 6
FSSC 22000’s requirements are layered across its scheme documents.
Part 4: The 8-Step Roadmap – Implementing Your EMP
Now that we understand the ‘why’ and the ‘what’, let’s move to the ‘how’. This is your practical roadmap, based on the 8 General Principles of Microbiological Risk Management from CODEX CAC/GL 63-2007.
This is a cycle. It’s circular because risk management is a continuous process of improvement.
Let’s break down each step.
Step 1: Identify the Risks
Before swabbing a single surface, you must know where the dangers are hiding. Consider both external and internal sources.
Step 2: Map and Zone the Facility
Draw a literal map of your facility and divide it into zones based on how close a surface is to the food product. This creates a hierarchy for your testing efforts.
How to Create Your Map:
Step 3: Assess the Risks
You can’t swab every site every day. You need to filter your long list down to the critical few by quantifying the risk.
Use the core formula: LIKELIHOOD × SEVERITY = RISK
Score each site using these five criteria:
This assessment assigns each site a Risk Score, which determines your monitoring frequency (e.g., high-risk sites weekly, low-risk sites monthly).
Step 4: Develop the Sample Plan
Now, build the operational plan. This document answers the questions: What, Where, When, and How?
Step 5: Set Action Limits
You need to define the ‘line in the sand’—the criteria that will trigger a response. This involves setting Alert and Action Limits.
Key Principle: Action limits should be more sensitive than acceptance criteria.
Step 6: Train the Team
A plan on paper is useless if the people on the floor don’t know how to execute it. Training must be role-specific.
Step 7: Document Everything
In food safety, “If it isn’t written down, it didn’t happen.” Your documentation is your evidence.
Your documentation package must include:
Step 8: Monitor and Review
This is the engine of continuous improvement, connecting the end back to the beginning.
Conclusion: Your Journey to a Safer Facility
Implementing a robust Environmental Monitoring Programme is not a one-time project; It’s a fundamental shift in how you view your facility, moving from relying on visual inspection to using scientific data. By following these 8 steps, you transform your EMP from a simple “audit box” into a vital diagnostic tool. You enable your team to see the invisible enemy, measure what you manage, and proactively protect consumers, your brand, and business. The rules are set, standards are clear, and the roadmap is here. The next step is yours. Start today.
For assistance with the development of your Environmental Management Programme, contact info@entecom.co.za